


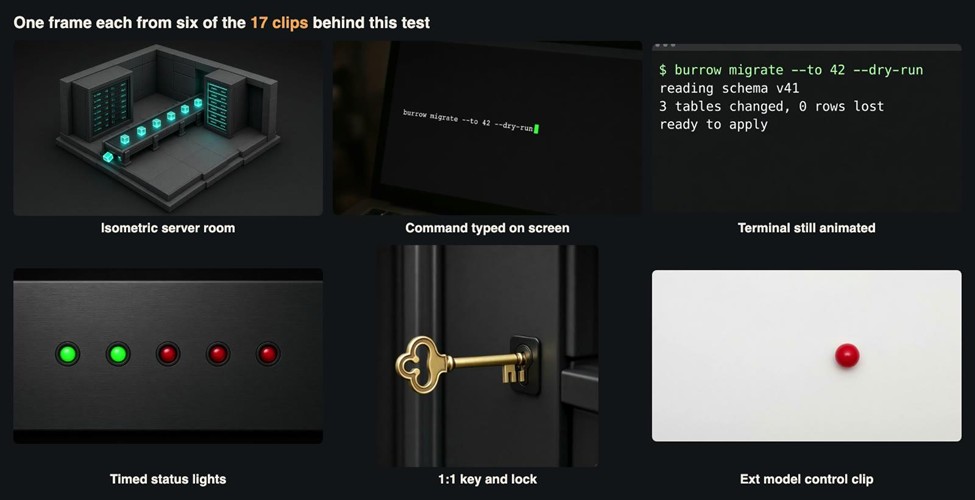
One frame each from six of the 17 clips generated for this test.
Most writing about AI video judges the output the way a viewer would: does it look good? A developer wiring a video model into a docs site or a release pipeline has a different list of questions. Can the same input give the same output? Will a command shown on screen be spelled correctly? Does a timed instruction land on time? What happens when you submit ten jobs at once, or a malformed one? And how big is the file that finally ships to the page?
We put those questions to xAI’s Grok Imagine Video 1.5 through its API. The scenario is invented: a three-person docs team maintaining burrow, a database migration CLI we made up for this test. They want short motion assets for release notes and documentation pages: a command being run, a status panel going green, a square clip for a social post. They would like to generate those from a script, the way they already generate API references, and they want to know where that idea breaks.
We ran nine tests, generated 17 clips and spent $3.03 on generation. Every prompt below is printed exactly as sent, and every number comes from our logs, from ffprobe and ffmpeg, or from a small OpenCV script. Each test notes what worked and what did not. A narrated walkthrough video is near the end.
The model and the setup
The request is simple. You send a prompt of up to 8,000 characters, plus optional reference images, and get back a clip of 1 to 15 whole seconds at 480p, 720p or 1080p. Two model IDs are relevant. grok-imagine-video-1.5 is xAI’s official model. grok-imagine-1.5-video-ext is a cheaper variant that stops at 720p and needs at least 6 seconds. Neither edits existing video.
The official model’s list prices at the Gold member tier were $0.064 per second at 480p, $0.112 at 720p and $0.20 at 1080p, with the Ext model at $0.0102 per second at 480p. Our account was billed at the Diamond tier, so the costs reported here are a little lower: $0.0576 per second at 480p and $0.1008 at 720p on the official model, about $0.0092 per second on Ext, and $0.0072 per reference image. If you are on a different tier, scale our numbers accordingly.
Generation is asynchronous. A POST returns a task ID, and you poll a task endpoint until the status is completed or failed. Result URLs last 72 hours, so a pipeline has to download files promptly. The helper below is close to what we used. The host and key come from environment variables. Note that the task ID goes to a log file before polling begins, which turned out to matter in Test 7.
import json, os, time, requests
BASE = os.environ[“VIDEO_API_BASE”] # your provider’s host
HEADERS = {“Authorization”: f”Bearer {os.environ[‘VIDEO_API_KEY’]}”}
def render(name, prompt, seconds=5, resolution=”480p”, ratio=”16:9″, refs=None):
payload = {“model”: “grok-imagine-video-1.5”, “prompt”: prompt,
“duration”: seconds, “resolution”: resolution,
“aspect_ratio”: ratio}
if refs: # omit the field when there are none
payload[“image_urls”] = refs
r = requests.post(f”{BASE}/v1/videos/generations”, headers=HEADERS,
json=payload, timeout=60)
r.raise_for_status()
task_id = r.json()[“data”][0][“task_id”]
with open(“tasks.log”, “a”) as log: # write the ID before polling
log.write(json.dumps({“name”: name, “task”: task_id}) + “\n”)
while True:
time.sleep(5)
task = requests.get(f”{BASE}/v1/tasks/{task_id}”, headers=HEADERS,
timeout=30).json()[“data”]
if task[“status”] == “completed”:
return task[“result”][“videos”][0][“url”][0], task.get(“cost”)
if task[“status”] == “failed”:
raise RuntimeError(task[“error”][“message”])
To keep the bill small we designed all the tests before generating anything, used 480p and 3 to 5 seconds for comparisons, and allowed ourselves a single 720p clip.
Test 1: official model against Ext
The first decision for any pipeline is which model to default to. We sent the same prompt to both at 480p, 5 seconds on the official model and the 6-second minimum on Ext:
Isometric 3D scene of a small server room built from matte graphite blocks. Glowing teal data cubes travel along a narrow conveyor from a rack on the left to a rack on the right. Static camera, soft even studio light, dark background, clean technical illustration style, no text, no people.
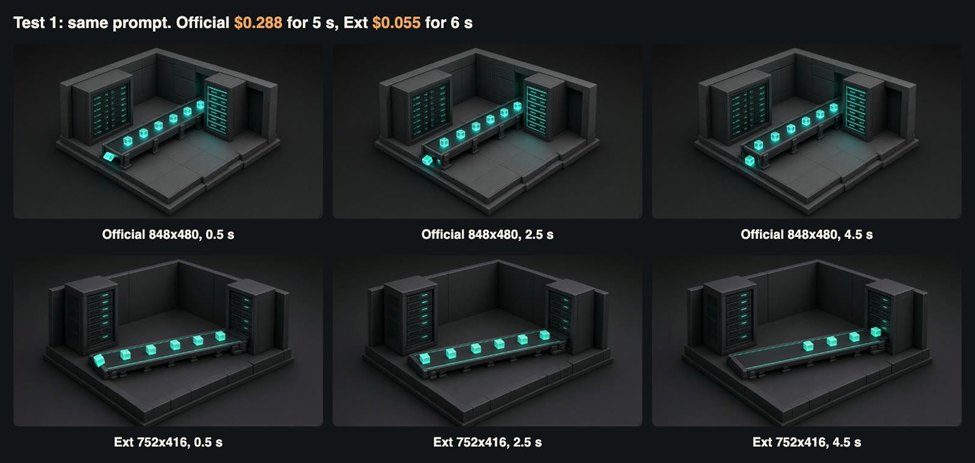
Test 1. Top row: official model. Bottom row: Ext. Both obey the static camera and the no-text instruction.
The official clip took 34 seconds and cost $0.288. The Ext clip took 41 seconds and cost $0.055, about one-sixth of the price per second. “480p” also means different things: the official model returned 848×480, and Ext returned 752×416, roughly 23% fewer pixels. Both are H.264 at 24 fps.
Neither clip is clean. On the official model, an extra cube keeps appearing below the left end of the conveyor, detached from anything. On Ext, the conveyor empties from the left toward the end of the clip, so the last second has a visibly bare belt. The official frame has finer detail on the rack panels. For a thumbnail-sized illustration in a changelog, that difference is hard to justify at six times the price. The practical rule we took from this: use Ext to explore prompts and for high-volume filler, and spend official-model seconds only on clips that will actually ship.
Test 2: is the same prompt repeatable?
Build systems like determinism. The API exposes no seed parameter, so we measured what that means in practice by running the Test 1 prompt on the official model twice more, giving three runs at identical settings. We then computed the structural similarity (SSIM) between frames at the same timestamp. As a yardstick, we also compared each clip’s first frame with a frame 4.5 seconds later.
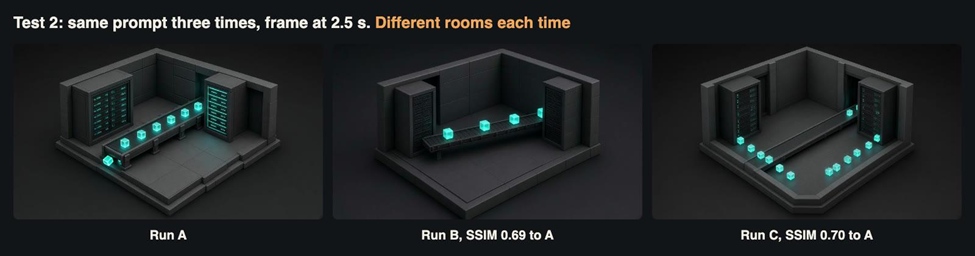
Test 2. Same prompt, same settings, three different rooms.
| Comparison | SSIM |
| Run A vs run B, frame at 2.5 s | 0.690 |
| Run A vs run C, frame at 2.5 s | 0.701 |
| Run B vs run C, frame at 2.5 s | 0.689 |
| Within run A, 0 s vs 4.5 s | 0.940 |
| Within run B, 0 s vs 4.5 s | 0.961 |
| Within run C, 0 s vs 4.5 s | 0.941 |
The numbers match what you see. Each clip is stable within itself, but separate runs are different scenes: the room layout, the conveyor position and the rack designs all change. Run C went further and let a chain of cubes wander off the belt and around the floor, which the prompt never asked for. Costs were $0.288 per clip and renders took 44 and 45 seconds for the two extra runs.
For a pipeline, this has one clear consequence. A clip is a build artifact to be generated once, reviewed and committed, not an output you can regenerate on each deploy. Treat the prompt as documentation of intent, and store the MP4 (or its hash and location) alongside it. If your docs build calls the API each time, your illustration changes on every release, and so does your bill.
Test 3: a command on screen
A docs clip is useless if the command is misspelled, so this is the test the team cared most about. We asked for an exact string with punctuation that often trips up image models, including double hyphens and digits, and ran it at both 480p and 720p:
A close-up of a dark terminal window on a laptop screen in a dim room. White monospaced text is typed one character at a time, and the finished line reads exactly: burrow migrate –to 42 –dry-run. A green cursor blinks at the end of the line. Slow push-in, no other text, no people.
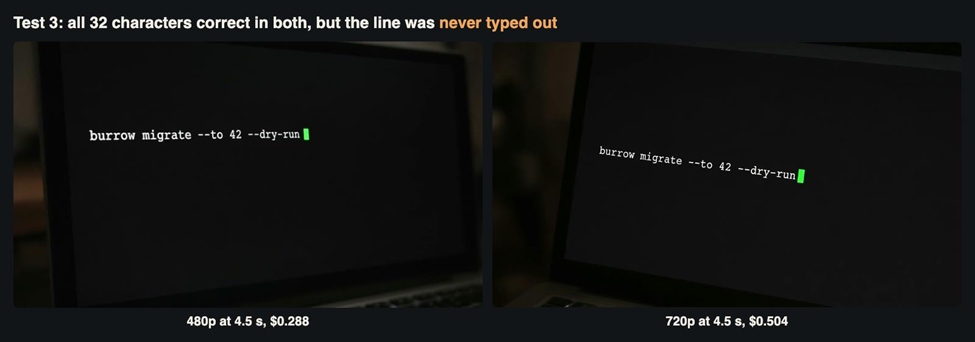
Test 3. Both resolutions spelled the 32-character command correctly at the frames we checked.
The spelling result is better than we expected. In the eight frames we sampled from each clip, all 32 characters were right at both resolutions, double hyphens included. The cursor is green and the push-in happens. Costs were $0.288 at 480p and $0.504 at 720p, and both tasks took 44 seconds, so at these settings the resolution did not change the render time.
The instruction that failed was the interesting one. The text was never typed. The complete line is on screen from the earliest frame we sampled in both clips, and it just sits there. If your clip’s purpose is to show a command being entered, this approach will not deliver it. The type is also not really monospaced: the 720p clip uses a slab face, and in the 480p clip “burrow migrate” drifts bolder than the rest of the line as the camera moves. It reads as a fair picture of a terminal, not as your terminal. A screen recording is still the right tool for showing real CLI behaviour, and we would not put a generated command in documentation where a reader might copy it from a video.
Test 4: animating a real terminal still
If you already have the exact screen you want, you can pass it as a reference. We made a still showing the command and three lines of output, then asked for almost nothing to happen. Reference images must be public HTTPS URLs, and each one is billed.
Keep this terminal window exactly as it is, with every character unchanged. The green cursor blinks after the last line. The window very slowly moves closer to the viewer. No new text, no typing, no other changes.
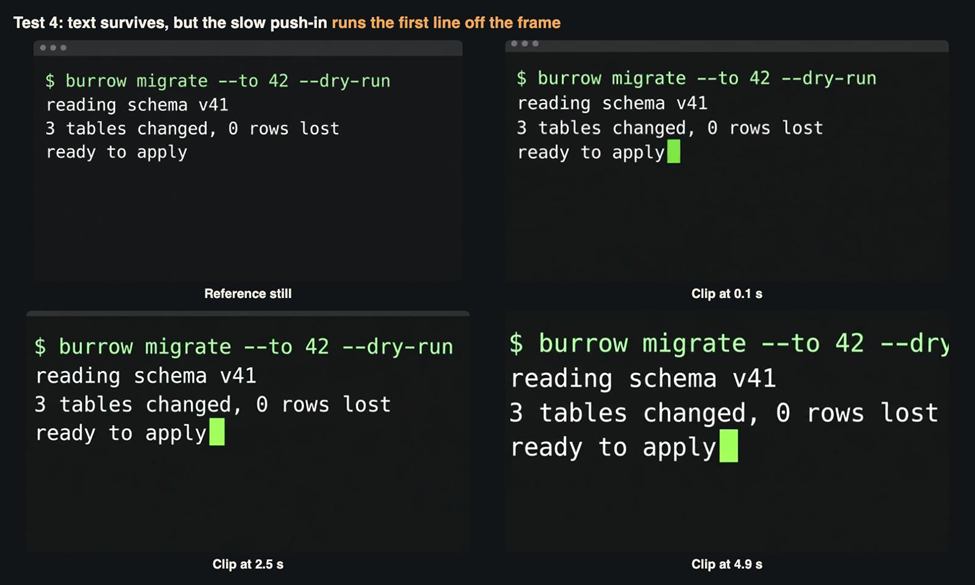
Test 4. All four lines stay accurate, but the first line leaves the frame by the end.
This was the fastest task of the official-model set at 23 seconds, and it cost $0.295: the 5 seconds plus one reference image. Text fidelity was excellent. The four lines of text held up through every frame we sampled, with no characters changing as they scaled. The model even added the green block cursor we described, which was not in the still.
The failure was camera scale. “Very slowly” was not slow enough. By 2.5 seconds the first line touches the right edge, and by 4.9 seconds the end of –dry-run is gone. For a docs clip, that hides the most important part of the command. The fix we would try next is to leave more empty margin around the text in the still, or to ask for no camera movement at all and let only the cursor change.
The output was also not the size we expected. A 16:9 request with this reference came back at 736×400, a slightly wider shape than 16:9 and fewer pixels than the 848×480 text-to-video clips. If your layout has fixed dimensions, read the real width and height from the file rather than assuming them from the request.
Comparing Tests 3 and 4 gives the most useful rule for developers in this article: if on-screen text matters, supply it in a reference image. For about the same money, the model preserves text it is shown more dependably than it renders text it is told about, and you get to choose the font.
Test 5: aspect ratios in real pixels
The Grok Imagine Video 1.5 API reference lists aspect ratios including 16:9, 9:16 and 1:1, and we wanted to know what they mean in pixels and whether a small physical action survives the change of frame. We used 3-second clips to save money, at $0.173 each, and we always set the ratio explicitly:
A single brass key slowly turns in a matte black server cabinet lock, shallow depth of field, soft side light, static camera, no text, no people.
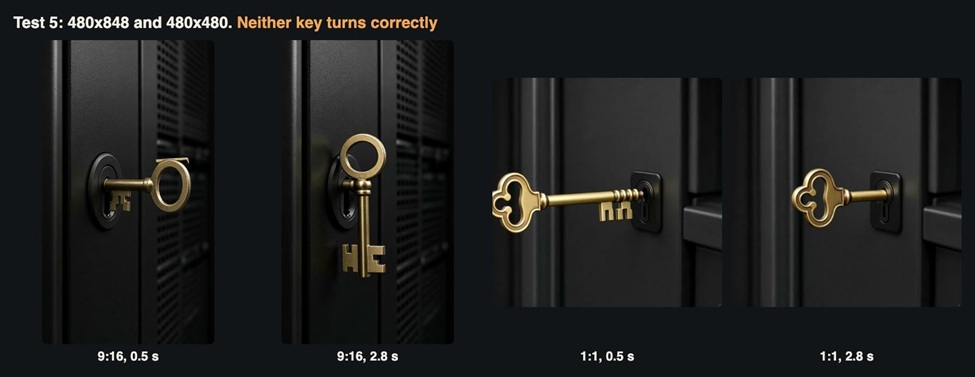
Test 5. The vertical key changes shape as it moves. The square key slides in and stops.
In these two clips, 480p refers to the short side: 9:16 returned 480×848 and 1:1 returned 480×480. Both took 45 seconds. Framing was sensible in both, with the lock and key staying well inside the frame.
The action was wrong in both, in different ways. In the vertical clip the key starts to rotate, then its geometry breaks: by 2.8 seconds the shaft hangs vertically below the ring, while a stub remains in the lock. In the square clip the key slides into the lock and stops, which is tidy but is not the turn we asked for. Mechanical actions with one correct outcome are a weak spot. Abstract motion, like the status lights in the next test, did much better.
The file sizes also varied more than the pixel counts would suggest: 595 KB for the vertical clip against 229 KB for the square one, at the same duration. Some of that is pixel count, and some is the amount of movement. Do not budget page weight per clip from one sample.
Test 6: can a prompt act as a timeline?
There is no keyframe API here, so developers will try to write timing into the prompt. We gave the model a scene that a script can measure, a row of lights that change colour on a schedule:
A row of five server status lights on a dark brushed metal panel, seen straight on with a static camera. Timeline: from 0 to 1 second all five lights are red. At 1 second the first light turns green. At 2 seconds the second light turns green. At 3 seconds the third light turns green. At 4 seconds the fourth and fifth lights turn green together. Nothing else moves. No text, no people.
We located each light in the final frame with OpenCV, then walked through all 121 frames and recorded when each one turned green and stayed green.
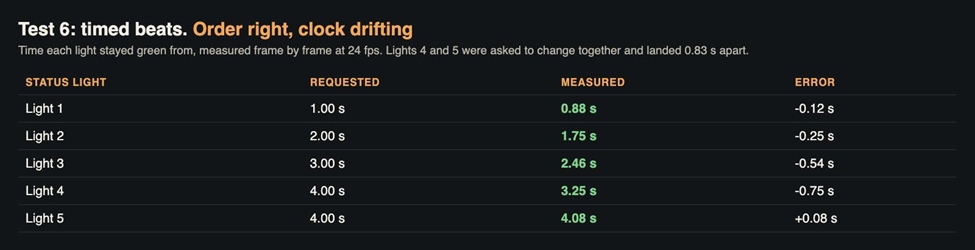
Test 6. Measured at 24 fps. The sequence is right, but the timing runs ahead of the schedule.
This was the best-looking clip of the set, and the most useful result. Five lights, in the right order, on a truly static camera, with nothing else moving. A status panel like this could go straight into a release post. It cost $0.288, although it took the longest of any task at 64 seconds.
The clock is another matter. The first light was 0.12 seconds early, and the error grew to 0.75 seconds by the fourth. The fourth and fifth lights were supposed to change together and instead landed 0.83 seconds apart. Treat a written timeline as a statement of order, not of time. If your clip must sync with narration or a UI state, plan to retime it in post using the measured transitions. A short analysis script like ours can find them automatically.
Before this test we would have said a five-part instruction was too much to ask. It suggests the opposite. A scene with few objects, a fixed camera and countable events is where the model is most obedient, and those are the visuals technical documentation needs most.
Test 7: fan-out
A release job may need several clips at once, so concurrency matters. We used the cheapest option, Ext at 6 seconds and 480p, for $0.055 a clip. We submitted a batch at the same moment from a thread pool, then ran two more one after the other as a baseline. The prompt was deliberately trivial, a red ball rolling across a white desk.
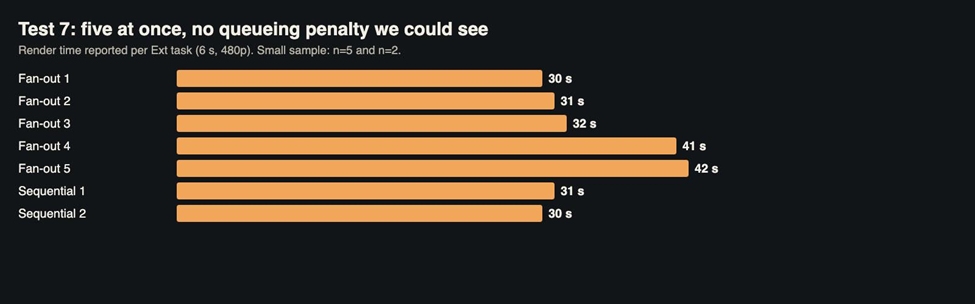
Test 7. Render time per task. The sample is small, and this says nothing about limits at larger scale.
All five concurrent tasks completed, in 30, 31, 32, 41 and 42 seconds, and the two sequential tasks took 31 and 30 seconds. So three of the five showed no penalty and two took about 10 seconds longer. Five parallel clips were finished in the time of less than two sequential ones. This is a small sample at a modest concurrency, so it says nothing about what happens at 50.
The batch was meant to have six tasks. One submit died with a TLS error before returning a task ID, on our proxied connection. We did not retry it, which is the point of the logging in the helper. A network error during a POST leaves you not knowing whether a task was created, and a blind retry can bill you twice. The safe policy in a pipeline is to write task IDs as soon as you have them, resume polling from the log after a crash, and treat a failed submit as something to reconcile before resubmitting. A crash in our own logging code during this batch cost us nothing for that same reason: all the task IDs were on disk, and we could recover each result.
Render times across all 17 clips ranged from 23 to 64 seconds. Neither length nor resolution predicted them well in this small set: 5 seconds at 480p and at 720p both took 44 seconds, while a 3-second clip took 45.
Test 8: bad requests
Pipelines fail on bad input, so we sent malformed requests on purpose to see when they are rejected. We set the duration to 1 second wherever we could, so a surprise acceptance would have been cheap. None of these cost anything.
| Request | Result | When |
| duration: 1.5 | HTTP 400 | At submit |
| duration: “1” (a string) | HTTP 400 | At submit |
| duration: 0 or 16 | HTTP 400, range stated | At submit |
| resolution: “4k” | HTTP 400 | At submit |
| aspect_ratio: “21:9” | HTTP 400 | At submit |
| image_urls: [] | HTTP 400 | At submit |
| Ext at 1080p | HTTP 400 | At submit |
| Ext at 5 seconds | 200, then task failed | Immediately after submit |
| Base64 data URL as a reference | 200, then task failed | About 32 s later |
| Dead reference URL | 200, then task failed | About 34 s later |
Schema errors come back in about a second or two, which is what you want. Durations must be JSON integers, and a string will not be coerced, so watch out if your clip lengths come from YAML or environment variables.
The bottom three rows are the ones to design for. A 200 on submit only means the request was accepted, not that it will work. Input problems with images show up half a minute later as a failed task, and the message for the dead URL read like a temporary fault rather than a bad input. All of them cost $0. So check that your reference URLs return 200 before you submit, and do not retry failed tasks in a tight loop without looking at why they failed.
Test 9: getting clips onto a docs page
This last test used no API credit. Delivered files are larger than a docs page needs, and they contain two things worth knowing about.
First, there is an audio track in every clip, even though none of our prompts mentioned sound. Measured integrated loudness on the clips we checked ranged from -28 LUFS on the vertical key clip to -60 LUFS on the status lights, and the Ext control clip read at the scanner’s -70 LUFS floor. Decorative clips on a docs page should have it removed.
Second, each MP4 carries an extra video stream holding a single JPEG poster image. Our first GIF conversion failed outright, because the muxer found two video streams. Always map the first video stream explicitly:
ffmpeg -i in.mp4 -map 0:v:0 -an -c:v libx264 -crf 28 -preset slow \
-pix_fmt yuv420p -movflags +faststart out.mp4
ffmpeg -i in.mp4 -map 0:v:0 -an -c:v libvpx-vp9 -crf 36 -b:v 0 -row-mt 1 out.webm
ffmpeg -i in.mp4 -filter_complex \
“[0:v:0]fps=12,scale=640:-2:flags=lanczos,split[a][b];[a]palettegen[p];[b][p]paletteuse[o]” \
-map “[o]” out.gif
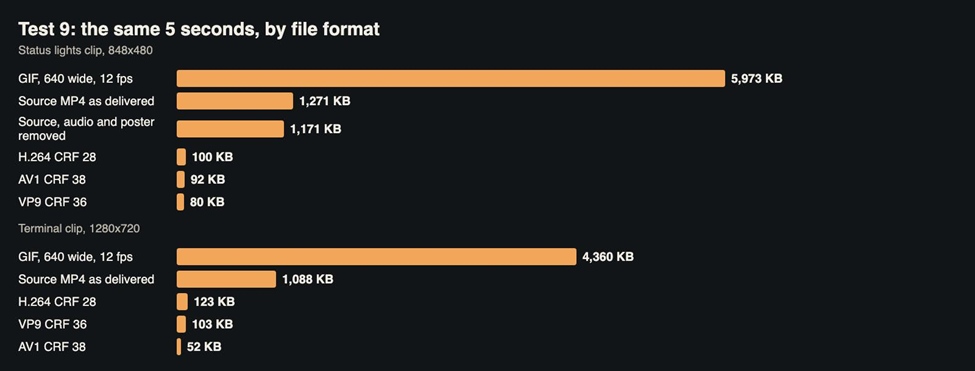
Test 9. File sizes for two 5-second clips. The source MP4 has a far higher bitrate than these simple scenes need.
| Format | Status lights, 848×480 | SSIM to source | Terminal, 1280×720 | SSIM to source |
| Source MP4 | 1,271 KB | n/a | 1,088 KB | n/a |
| H.264, CRF 28 | 100 KB | 0.949 | 123 KB | 0.995 |
| VP9, CRF 36 | 80 KB | 0.953 | 103 KB | 0.995 |
| AV1, CRF 38 | 92 KB | 0.966 | 52 KB | 0.996 |
| GIF, 640 wide, 12 fps | 5,973 KB | not measured | 4,360 KB | not measured |
Re-encoding cut the source by 89% to 95% on these clips. The terminal clip barely changes, since it is mostly flat dark background. The status lights clip loses more, because the brushed metal texture is what a CRF encode throws away first. The GIFs were 35 to 60 times the size of the H.264 versions at a lower resolution and frame rate, so we would not use GIF unless a platform leaves no other choice. These encodes took under a second each on our machine, so this step fits easily into a build.
What it cost
| Item | Clips | Cost |
| Official, 5 s, 480p | 5 | $1.440 |
| Official, 5 s, 720p | 1 | $0.504 |
| Official, 5 s, 480p, one reference image | 1 | $0.295 |
| Official, 3 s, 480p | 2 | $0.346 |
| Ext, 6 s, 480p | 8 | $0.441 |
| Two reference stills (one not used in the end) | $0.006 | |
| Total | 17 | $3.03 |
Failed tasks and rejected requests were billed at $0. The narration for the video below is not in this table.
The walkthrough video
Narrated walkthrough of the nine tests, using the generated clips with their original audio removed.
Checklist for a video build step
- Generate once, then commit. Three runs of one prompt gave three different scenes, so store the file and keep the prompt as a record of intent.
- Draft on Ext. At about one-sixth of the price per second it is good enough to test a prompt, as long as you accept the smaller frame and the 6-second minimum.
- Put exact text in a reference image. It held up better than text described in the prompt, and you control the font.
- Leave margin for camera moves. “Very slowly” still pushed a command off the frame within 5 seconds.
- Keep scenes countable. A few objects, a fixed camera and discrete events gave the best results. Mechanical actions were the weakest.
- Treat written timing as order. Expect errors of up to about 0.8 seconds, and retime clips in post if sync matters.
- Log task IDs before polling, and validate before submitting. A 200 is not success, and a blind retry after a network error can double your bill.
- Re-encode everything. Map 0:v:0, drop the audio, and expect savings of around 90%, with little measured loss on flat scenes and more on textured ones. Read the real dimensions from the file.
The bottom line
Grok Imagine Video 1.5 can work inside a docs pipeline if you treat it as an asset generator rather than as a deterministic build step. It spelled a 32-character command correctly at both resolutions we tried, kept the text of a reference image intact through a push-in, and ran five lights in the right sequence on a fixed camera. It did not type a line out, did not turn a key, did not hit a written schedule to the second, and did not produce the same scene twice.
That split suggests a sensible division of work. Use the model for illustrative motion such as status panels, data flows and abstract system scenes, where small variations are harmless and a human reviews the clip once before committing it. Keep real screen recordings for anything a reader might copy or rely on. For the fictional burrow team, the plan would be: draft on Ext, render the winner at 480p or 720p on the official model, re-encode to about 100 KB, and check the file into the docs repository with its prompt beside it. At roughly $0.30 for a finished 5-second clip, the review step costs much more than the generation, and that is where the attention should go.
Leave a Reply